

When you are about to tow a trailer, bike rack, or cargo carrier, one of the most useful additions to your vehicle is how to install a trailer hitch. A trailer hitch is a metal piece that attaches to the frame of the rear of your truck or SUV, which provides you with the capacity to pull heavy loads safely. It is essential to individuals who make use of their automobiles to commute, work, or take off-road tours with Gresham 4 Wheel Drive.
Installing a trailer hitch has been quite popular today since most drivers desire additional pulling capabilities and vehicle functionality. It could be a hitch receiver installation, or an entire towing system, but it is all with the objective of enhancing towing capacity and safety. Most SUVs and pickup trucks come with a variety of towing hitch applications, making them more diverse and practical for use.
But it can cause severe problems when installed improperly, such as low stability or even damage to the frames. This is the reason why one should know how to install a trailer hitch beforehand. We will make sure that all things are easy, convenient, and easy to follow in this guide so that you clearly understand all the steps in the process.
What is a Trailer Hitch?
A trailer hitch is a powerful metallic device that is fixed at the back of a truck or SUV. It is used to attach towing apparatus such as trailers, bike racks, or cargo carriers. And it is the primary section that enables towing safely, should you be learning how to install a trailer hitch.
Various models of towing hitch systems include receiver hitch, bumper hitch, and heavy-duty 5th-wheel hitch. All types would suit various weights and requirements of any vehicle. Others can be light towing, and others off-road, as well as heavy-duty, intended to be used in 4×4 vehicles and trucks that get serviced in Gresham 4 Wheel Drive.
Simply put, a trailer hitch transforms your car into a towing machine. It makes your car more useful as you can easily carry loads. This is the reason why, prior to a trip or going to work, many people read about installing a trailer hitch.
Also Know About: Types of Hitch Receivers: Simple Guide for Beginners
What Tools are Needed for Installing a Trailer Hitch?
The use of bolts and metals is not the attachment of a trailer hitch, but the use of the necessary tools to guarantee that all is attached and well secured. When you are acquiring knowledge on how to install a trailer hitch, then proper equipment is crucial since a little slip can influence the safety during towing. It is our goal at Gresham 4 Wheel Drive to assure our customers that good tools will make the job faster, safer, and more professional. Simple Supplies that you will require.
Below are the tools that will be required in most jobs to install trailer hits:
- Socket wrench set (different sizes with bolts)
- Torque wrench (to screw the bolts to the right specification)
- Wrench set (to keep nuts in place)
- Jack and jack (lift to support the vehicle)
- Screwdrivers and trimming tools (to take away panels in case of necessity)
- Tape measure (to line up correctly)
These tools help you to deal with hitch receiver installations, installing frames, and tightening bolts accurately. Otherwise, the installation can be unsafe or uneven.
Also Explore: Cost to Install a Tow Hitch: Ultimate Price Guide
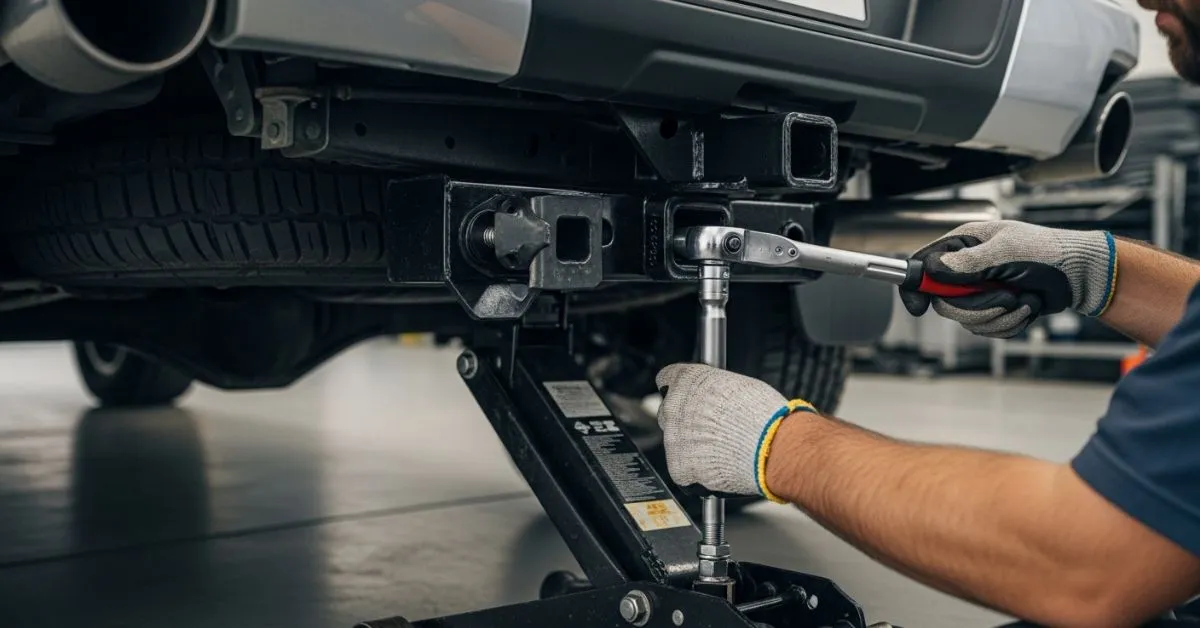
Step-by-Step Guide: How to Install a Trailer Hitch
At first glance, fitting a trailer hitch can seem a tough task, although, with a set of instructions that you are going to follow, it is quite easy and safe. The trick to installing a Trailer Hitch is to be patient and get everything in place. In Gresham 4 Wheel drive, we never suggest going to the last sequence, but rather rush the process, as accuracy is an important factor of towing safety.
- Step 1: Read the instructions: Installing a trailer hitch kit is a very simple task, but it should be well-read through before you commence with the installation. Frame design and the torque needed are different on every vehicle, and there are instructions to guide you in making errors. This is to allow you to know the mounting points and safety requirements in detail.
- Step 2: Obtaining the necessary equipment: At this point, you need to get all the tools and equipment that you will need in order not to be interrupted during the installation. With a torque wrench, sockets, jack stands, and safety equipment, it is a smooth ride to have everything ready. This is an important step in getting ready so as to have a safe and clean installation process.
- Step 3: Position Hitch: Fit the trailer hitch now under the rear side of your vehicle and position it so as to be lined up through the factory mounting holes. Ensure the hitch receiver is in place and fits well on the frame without pressure. This is highly essential in learning to install a trailer hitch since proper placement means safety and balance in towing.
- Step 4: Attach Hitch to Frame: After hitching properly, begin to insert the bolts through the frame holes, following instructions. Screw them in to just tighten them initially and get a chance to play around with the location. We would always inspect at least twice and then make sure that it is fully tightened at Gresham 4 Wheel Drive so that there are no errors made during installation.
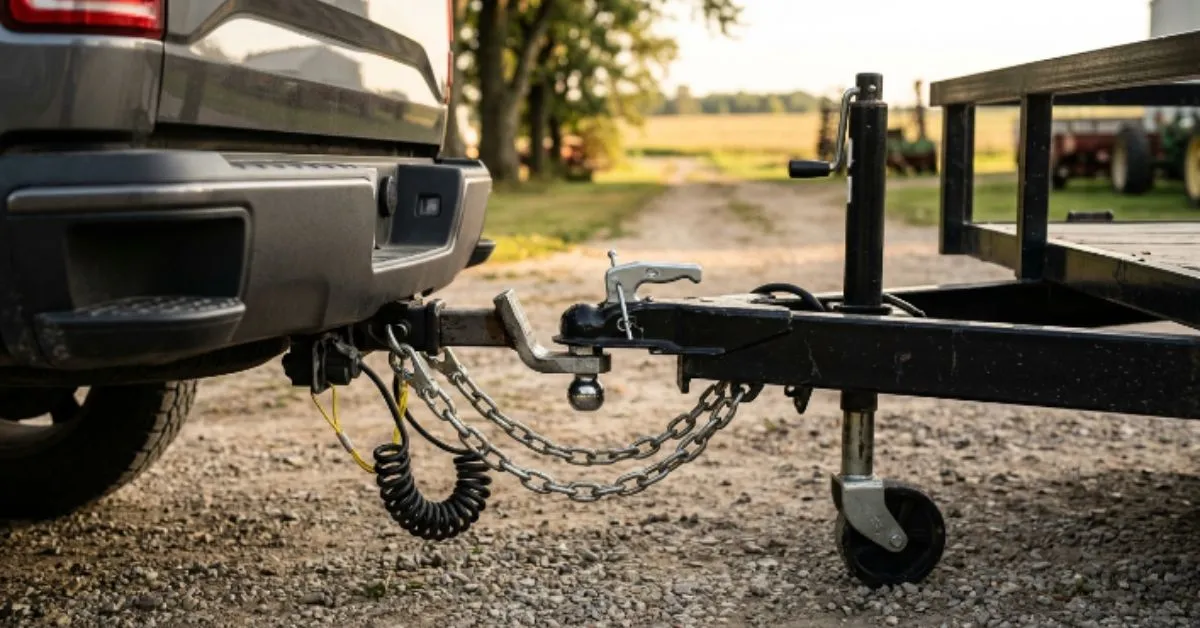
- Step 5: Secure Safety Chains: Safety chains are a linking connection that is necessary as a backup or support to your trailer in case the main hitch becomes loose. Properly fit them to the special hooks or loops in the hitch frame as indicated in the manual. In teaching to install a trailer hitch, this step should not be overlooked, as it incorporates additional measures to towing safety suggested by Gresham 4 Wheel Drive.
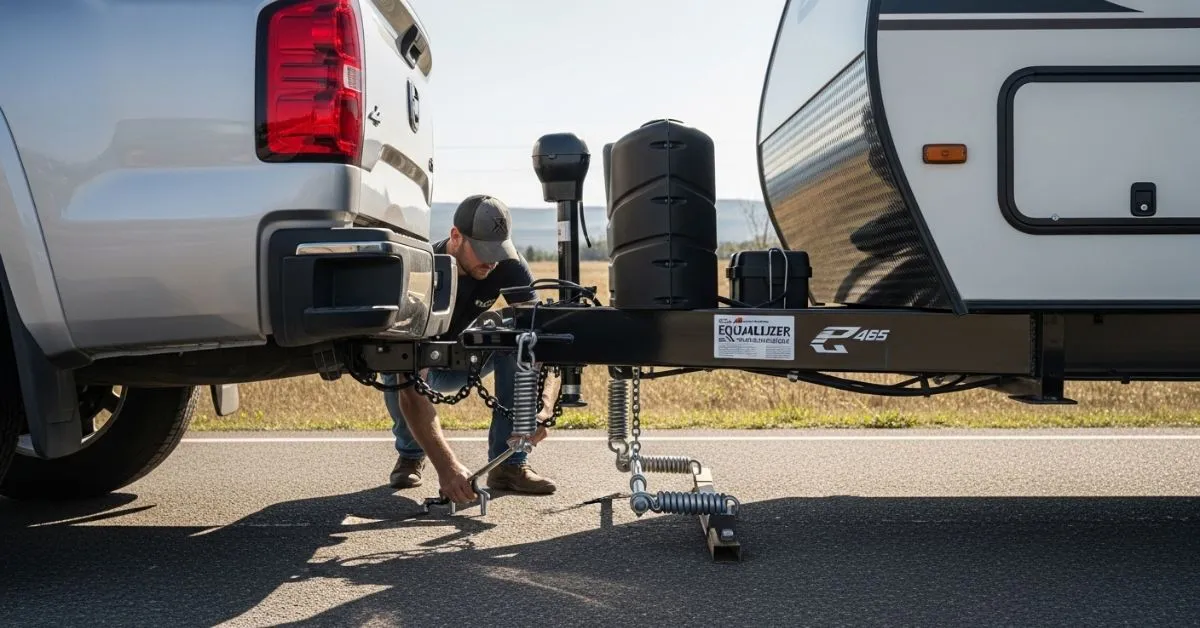
- Step 6: Final Checks: After all the installations are complete, do a big check and check all the bolts, nuts, and connections to make sure that they are tight. Check the hitch receiver fit and ensure that it does not move or loosely fit. The last step will conclude that your trailer hitch is properly attached, balanced, and can be pulled on the highway.
How Much Does it Cost to Install a Trailer Hitch?
The variation in the type of hitch, vehicle model, and labour cost will not imply that every vehicle will have the same cost for trailer hitch installation. The average cost of an average receiver hitch is estimated to be between $300-650 parts and labor. professional classifying could be as high as 1,000 or more, on heavy and complicated installations, such as fifth-wheel attachments. In Gresham 4 Wheel Drive, we never leave pricing so that customers can make the right choice of the setup that suits their towing needs.
Here is a simple idea of how the cost is usually divided:
- Hitch elements (receiver, bolts, wiring set): 120, 450.
- Labor charges (professional):$100, $200.
- Heavy-duty or custom setups: $700, $1,800+
Class 1 or Class 2 hitches are cheaper, and Class 3, Class 4, and fifth-wheel hitches are more expensive since they have a higher towing capacity, and they require a stronger frame mount. That is why installation charges of hitch towers could vary tremendously based on the kind of vehicle you have.
Also Explore: Class 2 vs Class 3 Hitch: The Ultimate Showdown
Common Problems People Face During Installation
When reading how to fit a trailer hitch, many individuals believe that it is a case of bolt it and walk away, but in the real world, it can be complicated due to minor problems. These issues generally occur due to improper alignment, absence of tools, or lack of experience. Figures of improper installation errors can frequently be observed at Gresham 4 Wheel Drive, which can be easily avoided with proper care and patience.
- Misaligned Hitch Frame Holes: This is one of the most prevalent issues of the hitch being put in the wrong position, compared to the holes of the vehicle frame. This occurs in cases where the hitch is not properly laid out in front of tightening bolts. The slightest misalignment might cause difficult installation and unsafe towing.
- Rusted or Tight Bolts: Older cars may feature rusted or stuck bolts, which are difficult to loosen up during installation. This may speed up the process and, in other cases, destroy the threads in case of excessive force. It is very important to use penetrating oil and appropriate tools to prevent this problem.
- Wrong Hitch Size Selection: consists of most individuals selecting the wrong hitch class or size used on their car without verifying towing capacity. This results in inappropriate fitment or insecure towing capability in the future. Move your vehicle specs and the kind of hitch before installation.
- Electrical Wiring Issues: Certain trailers require wiring of brake lights and indicators, and that can be perplexing to the user. Poor installation of wires can lead to of signals or road safety. This is why ideal wiring kits and guidelines are required to properly install them.
- Incorrect Torque Tightening: Miscalculation in tightening the bolts to the appropriate torque is another significant problem. Excessively tightened frames result in damage to the frame, whereas loosely fitted bolts result in frame movement during the process of towing. At Gresham 4 Wheel Drive, we never compromise on the right-hand tool of torque in order to make certain that safety measures are perfected.
Also Explore: Trailer Hitch vs Receiver Hitch: Shocking Differences Revealed
Maintenance Tips After Installing a Trailer Hitch
Once with knowledge on how to install a Trailer hitch, it is equally vital to maintain the hitch in good condition as much as the process of fitting it. Each time you tow, a trailer hitch is subjected to great stress, dirt, water, and road vibration. Regular maintenance is the best recommendation at Gresham 4 Wheel Drive because it will ensure the towing process is safe, smooth, and long-lasting.
- Periodic Checking of Bolts: To ensure that the bolts and nuts are tight and secure, they must be examined after every two trips. They may be forced to loosen by vibrations on the road and heavy loads, without their conscious awareness. The basics listed below will ensure your towing connection is safe and will prevent accidents.
- Rust Prevention Care: Trailer hits can be left in mud, moisture, and rain, which can result in rust. It is also advisable to coat or apply anti-rust spray in order to protect the metal parts and prolong their life of the parts. It is also well preserved as it is cleaned after driving off-road.
- Keep Hitch Receiver Clean: After its routine use, clean the hitch receiver, as it may collect dirt, sand, and grease, which can be wiped off. Washing it will be good so that it is well attached and is not blocked when towing accessories are being attached. A clean hitch is also easier and safer to tow in the future.
- Inspect Electrical Wiring: Make it a habit of inspecting the connectors on your trailer hitch when you are going to tow it, and when it has lights wiring. Loose or damaged wiring may lead to brake lights or indicators breaking down on the road. Safe driving, legal considerations, and due inspection can be considered.
- Lubricate Moving Parts: Lubricate the joints with grease and lightly grease the hitch receiver with grease to minimize wear and eliminate friction. It also makes sure that it is simpler to add or remove towing accessories as necessary. They should be lubricated regularly to improve the performance and ensure the hitch is made to be smooth.
Explore About: Pintle Hitch vs Ball Hitch: Best Option for Heavy Loads?
Why Choose Professional Installation from Gresham 4 Wheel Drive
Learning how to install a trailer hitch, some individuals tend to install it on their own; however, the slightest error in centering or connecting the bolts may cause serious problems in terms of towing safety. That is why it is better and wiser to be professionally installed at all times. We ensure your hitch is initially installed properly.
We have the correct tools, correct torque level, and knowledge of the vehicles to have a strong and secure fit. We do the hitch receiver, wiring maintenance, and frame adjustment carefully to make sure that your towing system functions well, without problems. This assists in enhancing stability and longevity.
Concisely, using Gresham 4 Wheel Drive saves your time and decreases risk. Rather than making over the installation process of a trailer hitch, you receive professional installation, correct safety inspections, and full confidence in any towing adventure.
Conclusion
Knowledge of how to install a Trailer hitch would be quite valuable in the event that you wish to safely tow your vehicle with towing capacities for trailers, bikes, or heavy loads. Whether it was selecting the proper tools or ensuring you take every step in the installation process, all of this constitutes a lot in ensuring that your towing setup is robust and effective. A fitted hitch enhances the safety, stability, and general performance of the vehicle.
We also realized that allowing simple things like improper alignment, loose bolts, or sub-standard wiring may lead to severe issues on the road. This is the reason to be very careful and always remember the right torque settings, the type of hitch, and perform constant maintenance upon proper hitch installation. These minor actions will have a huge impact on towing safety in the long term.
Gresham 4 Wheel Drive is at your service so that you can have a stress-free and professional outcome. You do not need to be concerned about how a trailer hitch is installed; you can leave it to our skilled workers to do all the tasks with accuracy, safety, and care so your vehicle is always ready for any towing adventure.
